Sunday, December 10, 2017

Unity GIU Blog Hop


Welcome you little Unity-loving Hooligans!  You all are amazing and I'm so happy you made it to my page.  You should have come here from Lori Simonson's blog.  I was so pumped to be a GIU gal, and now I get to share another piece of snark on this blog hop! 

I have a funny little card to share with you that I made for one of my best friend's at work.  He is going to love it.  I call him my work husband, and he calls me his work wife.  


The card is created from a  a really fun kit by Joslyn Nielson called Hey Stud.  Simple stamping, Prismacolor pencils, a whole lot of sass and this card came together like a dream.  Do you have someone in your life that you share a funny, sarcastic bond with?  You should comment below with a story about the friend you can joke around with at work.

Make sure to comment below, then follow the links under here to visit other GIU blogs.


Lori Simonson 
Shannon Edwards (You are here)

Amber Sheaves
Kim Chong 

Angela Bode 
MariLynn DeGroot
Amanda Rhodes 
Paula McClane 
Amanda Garrett  
Crystal O. Minkler 

Wednesday, December 6, 2017

Winner Winner Chicken Dinner

Thank you all so much for commenting with me on my Growing In Unity week last week.  I really appreciate all your kindness and snark!  You all are just the best.

I have the winners from my randomized drawing and they are:


Amanda Sheldon and Michelle Golz.  Please message me with your address so I can have Unity send out your prize ASAP!


Here are some thank you's that I've made over the last few months to show you my appreciation.  Pretend I sent them to each of you personally.


Also, don't forget to check out the winter GIU blog hop this Sunday, 12/10!  It'll be really fun, and I promise I'll supply you with some inspiration and a little humor. 

Friday, December 1, 2017

GIU Day 5: BE KIND TO SOMEONE

On the last day of GIU, I present to you the "Be Kind to Someone" Challenge. Johnny Karate's biggest lesson is to use your powers for positive change. If you are anything like me, you have a hundred cards just waiting for the perfect occasion to be used.  Today, my friends, is just that occasion!  You don't need to wait for a birthday or baby shower to use those fantastic cards in your pile.  Brighten someone's day just because.

I am a middle school teacher, so I get to interact with probably a hundred students a day as well as my colleagues.  I see teachers who are worn down, and students who need a pick me up all the time, but today I am going to do something about it.  I am bringing this card to school for a teacher in need of a good laugh.  I don't know who will receive it yet, but I'll know it when I see it.
We teachers love to know everything about what is happening in the school and with our students.  #dontjudgeus #wespillthetea

Here are some pictures of how I made this little snark card, and a few little things I did to make it special.


I stamped this cutie on the back!  Love!


What card doesn't benefit from a little envelope art?  

For the student I want to encourage I went simple.  I want my students to see me as someone in whom they can confide.  These little notes can change a kid's day or even week! If you aren't a teacher, maybe you have a kid of your own you can give a little paper love to.  Think of your siblings or a friend you haven't spoken to in a while as well.  Cards open up lines of communication, let people know that they are cared for and loved, and can brighten up even the gloomiest day.  Who wouldn't love to get a sweet little card like this in the mail?
Make sure to comment below and let me know how you plan on being kind to someone today, and you may win 25 beautiful Unity stamps yourself. Use your art for something positive!

Kits Used:

Follow me on Instagram @shannon.edwards

Thursday, November 30, 2017

GIU Day 4: TRY SOMETHING NEW

Welcome back Shannonites. I am pumped to TRY SOMETHING NEW today. Johnny Karate usually tries new things, like vegetables, but I wasn't willing to try a new food.  Instead I watched a  few videos on Youtube to come up with a new idea, and I really liked this video. Sometimes you just need a little inspiration to get you to try a new technique.

Here is my take.

My first step was to  emboss a piece of watercolor paper about 3/4 of the way down.  I used a paisley folder from Darice and a piece of 5"X 3.5" Canson watercolor paper. Note my ridiculously old Sizzix that I totally stole from my mom about 3 years ago.  It still works though!

Next I used about three colors of watercolor that were in my palette: two different blues and one purple. To start I wet the entire area so the watercolor I used would spread. I did more vibrant colors toward the top and faded them out using more water toward the bottom.
I then added some shimmery splatters using this metallic purple watercolor paint and this loose brush.  I think the splatters just add a little more texture and interest to this card.
Next I added a sentiment with Versafine ink in onyx black.  I used my MISTI to line up the sentiment exactly where I wanted it.  The MISTI has made my life so much easier; I must recommend every stamper get a stamping platform.
Also in the vein of trying something new, I used a kit I had not inked up yet. I have no idea how I waited this long to test her out, but how amazing is this planner girl?!?  Angie Blom really knows how to design a beautiful stamp. I water colored her with similar colors I used in the background.  Later, I fussy cut the image and popped her with pop dots.


For my final steps, I matted the background on some navy blue card-stock, tied some pale blue embroidery floss around the bottom, taping it in the back.  I added the popped image and then used double sided tape to attach my background to the purple card base.  


I hope with this project, I've inspired you to try something new.  Use Unity Design Team videos, Youtube, Instagram or Pinterest, and don't be afraid to try a different technique.  You'll never know how amazing you can be unless you get out of your comfort zone!


You can follow me on Instagram @shannon.edwards where I post all my little projects during the week.


Kits Used: 

Leave a comment below to get a chance to win a Unity grab bag with 25 glorious red rubber stamps.


Wednesday, November 29, 2017

GIU Day 3: KARATE CHOP SOMETHING

Hello my lovelies!  So glad you can join me as I take on the challenge of KARATE CHOPPING SOMETHING. 


I had to sharpen my karate paper chopping skills.  Check out these hand blades!


I'm going to be real with you right now when I tell you that I have too many scraps of paper.  My craft table scrap bin looks like this insanity:

Yes, I know. It's a sickness. ( I have two other scrap paper bins that are kind of sorted by color).  My problem is I never know how to use all these pretty little scraps.  I was pondering this issue while watching Property Brothers one day, and they were of course tiling a back splash in a kitchen with a Herringbone pattern!  Ding Ding Ding!!!! A light bulb moment hit me, and I knew I had to work that tiling idea into my scrappy card.


First I picked out 6 cool colors of paper.  They have different textures, shimmers, weights and patterns.  I wasn't concerned with anything other than I wanted them to be related by color.

Next I got to chopping.  I cut each pattern into 10 tiles that were .5" by 1" for a total of 60 tiles. It did not use up all my paper, but I did make a dent.  I tried using my sweet karate skills, but I relented and used my Fiskars chopper instead. 


There could be many right ways to make this tiled patterned paper, but this is how I did it.  I took a 3 3/4" x 5" white piece of paper and used double sided tape over the whole thing.  You could also run it through a Xyron sticker maker instead. I suppose you could use glue too, but I am too lazy for all of that.  I then started laying out my pattern.  I started in one corner and put three of the patterns going one direction and the other three going the other direction.  I think Jonathan and Drew would be proud of my handy work. 

Once I finished the pattern there were all kinds of pieces hanging off the sides.  So I trimmed them up, giving me this almost quilted looking background! I love the sparkly pieces the most :-).


Now to add some glorious UNITY!  I chose this duck from the kit Chillax Dude because he is so cool.  His sentiments are really funny too.  I watercolored him with some blues and that pop of orange.  

Finally, I matted my duck, put a strip of white with a sentiment from Planner Girl: Cold Outside, down and attached to my card. I took a tiny pen and made those little stitch dots to finish.  Bippity Boppity Boo, its done!

Well, my friends, I hope you enjoyed the KARATE CHOPPING of my scrap pile.  I challenge you to try this scrap-using technique or to come up with a new and innovative way to use up those little pieces of paper you can't just throw away.


You can follow me on Instagram @shannon.edwards where I post all my little projects during the week.


Kits used:

Comment below for a chance to win a Unity grab bag!

Tuesday, November 28, 2017

GIU Day 2: LEARN SOMETHING

Welcome back, Shannonians. Day 2 according to Johnny Karate's life lessons is LEARN SOMETHING! I'm so happy to share with you something I have learned this last year, and maybe you will learn from as well.  Unity continually inspires me to explore new techniques, from their Design Team videos to their Unity Show and Tell challenges.  I had never even tried watercoloring until this previous spring, but now it is my go-to for coloring images and backgrounds!

Just so you know, I am not claiming to be an expert on water coloring... far from it in fact.  However, I have watched a lot of videos and have picked up a few things to add to my CGBOT (Craft Geek Bag of Tricks).  So be kind as you see my process for water coloring this card!

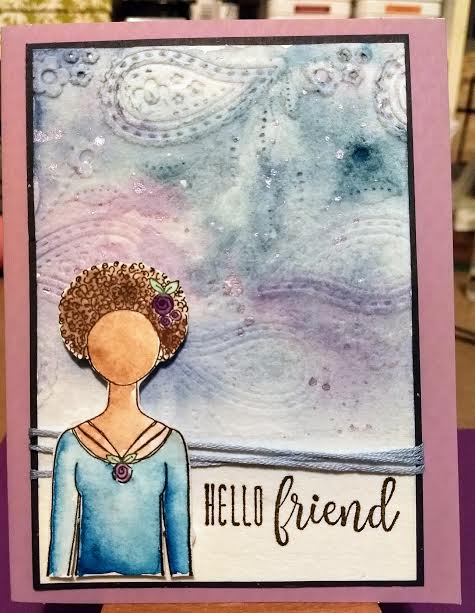
First I started with stamping the image in Versafine Onyx Black Ink on Canson XL watercolor paper.  I added a skin tone for her from my Reeves watercolor set.  

Her skin turned out a little light after it dried, so I went back in and darkened some shadowy areas.  The great thing about Angie Blom stamps is that she makes it easy to see where shadows would be.  Look at those little lines on her hand add so much detail!

Next, I wanted to color some of those sweet flowers and vines. I thought it was easier to see what the hair was once the flowers were already colored.  

I decided to do hair next.  Coloring hair can make or break your image.  I am not a coloring genius, like some artists are, but I follow a lot on Instagram and Pinterest.  One of the techniques I picked up from their tutorials is to leave some negative space or light color to add shine and depth.  I started with a light gold wash over almost all.  Then when the hair looked as it was being tucked away or on the thinner parts of the waves, I went in and added shadow with some darker browns.  Leaving light spots is so hard for me to do, but I know that those light spots are what make a watercolor image look polished. 

We are not done yet.  I had already chosen my paper for matting and I knew I wanted her shirt and accessories to have some light teal.  

To make her pop off the page, I decided to give her a little shimmery shadow using some shimmer water colors I got from Michael's.  They were really cheap, and I don't even know the brand, but they had this lovely little purple color that I thought this girl needed.  She looks so ethereal. 

She still seemed a little plain, so I matted the girl off with some scrap paper I had lying around. Then flicked some teal and purple shimmer watercolors on top to add visual interest to the background. I also took some wilted violet and black soot distress oxide ink and distressed the edges of the card.
The amount of water I used for the background made it pucker a little, but once I matted it, I knew she would look fine.  So I matted the image in a purple scrap I had, added a little teal polka-dot ribbon, and a sentiment from a different kit that I loved.  I stamped the sentiment words in three different colors that reflected the colors I used in my painting. Glue, tape, attach and voila!
Kits used:


You can follow me on Instagram @shannon.edwards where I post all my little projects during the week.


Thanks for sticking around and following my process.  I have many more things to learn and share with you this week.  I hope you will come back tomorrow to see how I KARATE CHOP something.  Also, remember to comment below to have a chance to win 25 beautiful red rubber stamps from Unity Stamp Company!


Monday, November 27, 2017

GIU Day 1: MAKE SOMETHING

Welcome to my first day as a Growing in Unity gal.  I'm so excited to be sharing some projects with you this week, in case you can't get enough of my incessant posting on the Show and Tell.  For those of you who have not seen my work, I hope you enjoy yourself.  For my #shanfans out there, (yes I just made that up) welcome and I look forward to getting to know you more this week as we comment together.


I have a method to my madness this week.  If you have seen and love the TV show Parks and Recreation, you will of course know who Johnny Karate is.  On his TV show he encourages the kids to do five things each day: make something, learn something, karate chop something, try something new, and be nice to someone.  So, this week we are going to do just that.  Day one, we are going to MAKE SOMETHING!


Today I am making something that I thought of because of Unity's "not a card" challenge.  So we are going to make some snarky lady magnets.


I bought these little mini canvases from a local craft store called Pat Catans, but I'm pretty sure Michael's and JoAnn Fabrics have them too.  I painted them with a little acrylic paint I had lying around, in pink, teal, light blue and yellow.


Sunday, November 26, 2017

Treat Yo Self

While I love making cards on the daily, I sometimes want to make something for myself.  I decided to make a mini 5X7 art journal that has all kinds of pretty images and inspiring sentiments that are really just for my enjoyment.  Some people use a big journal, but because I work primarily in cards, a 5X7 felt more comfortable to me.  I also use my art journal to try new techniques.

The picture below is my art journal page for the week.  I used so many stamps and techniques for this.  I'll post the stamps I used in the kits used section at the bottom.


I used to be very afraid of getting mess and distress-y, but not anymore.  It's my art journal, so if no one else likes it, who cares!?!?  It only has to make me feel something.

I started with some distress oxides and water color paper.  It started out with these four colors, but I added fossilized amber to the mix because it needed something.  The background smooshing, where I lay down color, spritz with water and plop my watercolor paper in it, was about four layers.  My first layer looked TERRIBLE, so I just kept building up layers.


Then came adding stamps. I used some stamps from my SMAK subscriptions!  I love that membership because it continually takes me out of my comfort zone and forces me to try new techniques!


Next, I wanted to add some paper piecing.  I LOVE paper piecing.  It is one of my favorite techniques because I get to use all my lovely scraps and papers.  I chose Lilli girl because she looks like me when I was in middle and high school.  I wore those overalls until the straps wore out.

Glue, pop dot, matte a sentiment, add some washi tape and... voila. An art journal page that speaks to me!

Make something just for you, today!  Treat Yo Self, and buy some Unity Stamps.  They really are the best, and I'm not being paid to say so. :-)

Kits used: